After logging in to the system, and navigating to the My Account screen, you can request for a new temporary or permanent connection for the existing connection.
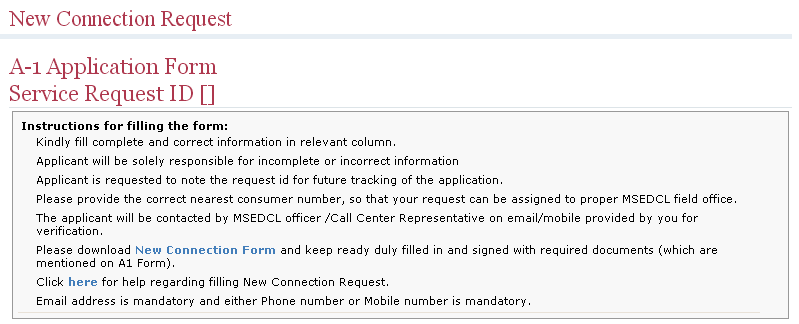
You can also create a request for a new connection without logging in to the system. Click New Connection Request in the WSS Module, a New Connection Request screen is displayed.
Alternatively, To create a request for a new connection without logging in to the system
Click New Connection Request in the WSS Module, A New Connection Request screen is displayed.

The General Information section contains the following fields and buttons.
Fields & Buttons |
Description |
Remarks |
Individual |
- |
Selected by Default |
Consumer Category |
Select a consumer category. |
- |
Supply Type |
Select the type of supply applicable. |
- |
Service Requested |
Select the type of service based on the requirement. |
- |
Application Date |
Current Date of System. |
- |
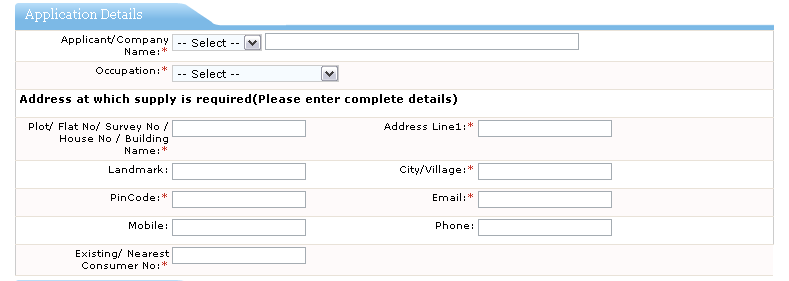
The Application Details section contains the following fields and buttons.
Fields & Buttons |
Description |
| Applicant/Company Name | Select the title from the drop-down list, and then enter the name of the consumer. |
Occupation |
Select the occupation of the consumer. |
Plot/Flat No/Survey No/House No/ Building Name |
Enter the data as applicable. |
Address Line1 |
Enter the consumer's address. |
Landmark |
Enter the consumer's address landmark. |
City/Village |
Enter either the city or village of the consumer. |
PinCode |
Enter the pincode of the address of the consumer. |
Enter the consumer's Email Id. |
|
Mobile |
Enter the consumer's Mobile Number. |
Phone |
Enter the consumer's Phone Number. |
Existing/Nearest Consumer No. |
Enter either the existing consumer number or the nearest consumer number. |
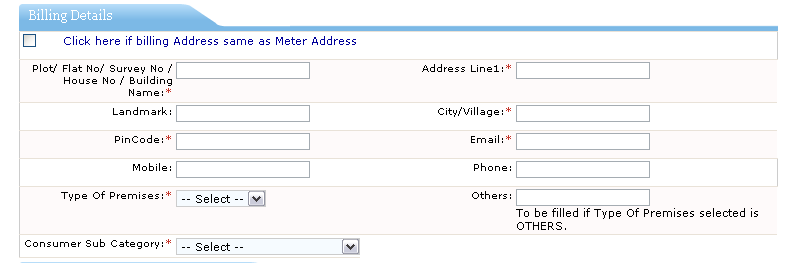
The Billing Details section contains the following fields and buttons.
Fields & Buttons |
Description |
Remarks |
|
Select to automatically upload data for the fields Plot/Flat No/Survey No/House No/ Building Name, Address Line1, City/Village, PinCode, Email, Mobile and Phone from the Application Details section. |
Select only when the billing address is same as the meter address. |
Plot/Flat No/Survey No/House No/ Building Name |
Enter the data as applicable. |
- |
Address Line1 |
Enter the consumer's address. |
- |
Landmark |
Enter the consumer's address landmark. |
- |
City/Village |
Enter either the city or village of the consumer. |
- |
PinCode |
Enter the consumer's pin code. |
- |
Enter the consumer's Email Id. |
- |
|
Mobile |
Enter the consumer's Mobile Number. |
- |
Phone |
Enter the consumer's Phone Number. |
- |
Type of Premises |
Select the type of consumer's premises from the drop-down list. |
- |
Others |
Enter relevant data. |
You can enter data in this field, only if the option Others is selected from the drop-down list for the field Type of Premises. |
Consumer Sub Category |
Select the sub category of the consumer from the drop-down list. |
- |

The Requested Load/Contract Demand section contains the following fields and buttons.
Fields & Buttons |
Description |
Remarks |
Requested Load |
Enter data for the requested load. |
Enter the data in figures. |
|
Select the unit for the requested load from the drop-down list. |
- |
Contract Demand |
Enter data for the consumer's contract demand. |
Enter the data in figures. |
|
Select the unit for the contract demand from the drop-down list. |
- |
The Requested Load/Contract Demand section is followed by a declaration form.


See Also


